Want to configure and install OpenVPN on your OpenWrt device? Just follow this step-by-step guide.
OpenVPN on OpenWRT Router immediately protects your internet privacy and security while giving you full internet freedom and instant access to content streaming. The steps below were tested on OpenWrt 18.06 running set on a Linksys E900 router that has the luci app OpenVPN plugin on-site, so it might not be the same on your firmware:
1Update and install OpenVPN client package.
Log in as root to the router via SSH using Terminal, or a client of your choice i.e PuTTY
By default, the address is 192.168.1.1 but it might differ from yours. If you do not know the address of your router, consult the router’s vendor support.
The default username and password are both set as root but it may differ if you have changed it from your end.
Ensure your package is up to date on your system. Run the command below:
opkg update
Install OpenVPN client package:
opkg install openvpn-openssl luci-app-openvpn
Now head to /etc/openvpn/
Create a file called tls-auth.key
vi tls-auth.key

Open the Wdc.key file from the Open VPN files folder (you just downloaded), copy and paste its content in the text editor, and save it.
Next, create a file called userpass.txt
vi userpass.txt
Enter your PureVPN Username and Password on the first line and the second line respectively and save it.
Purevpn0sxxxx
VPN Password
2Create OpenVPN configuration.
Login to the router’s Luci Web panel from your browser.

Navigate to Services > OpenVPN

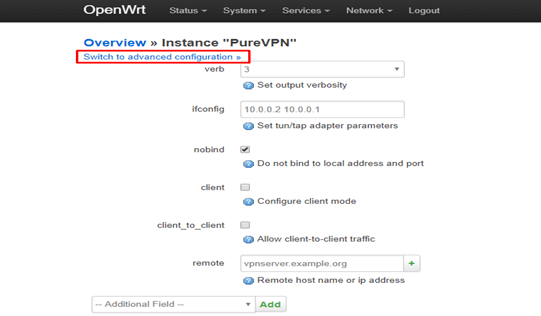
Create a new instance named PureVPN and select the 3rd option from the drop-down: Simple client configuration for a routed point-to-point VPN.
Click Add.

Click on Switch to the advanced configuration at the top right corner of the page to start configuring the OpenVPN connection.

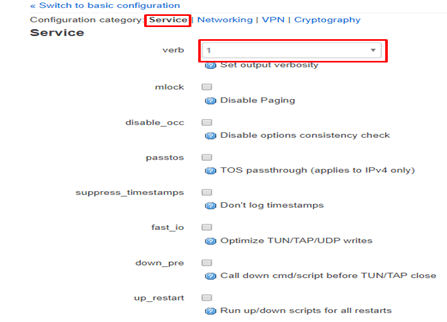
Under the Services tab, just ensure the verb is set to 1
Click Save.

Next, click on the Networking tab
Ensure these details are as below, leave others as it is.
port: 53
nobind: Checked
persist_tun : Checked
Note: If the stated field is not there, scroll down and select it from the Additional Field drop-down and click Add
Click Save.

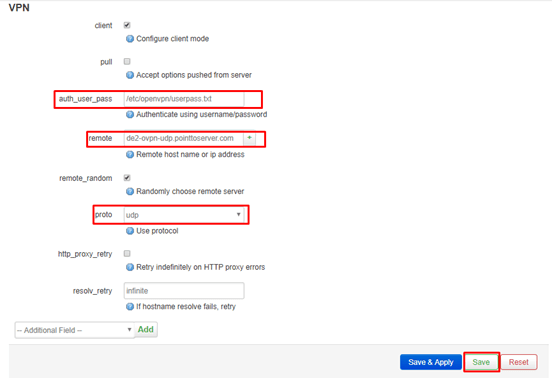
Next, click on the VPN tab.
Ensure these details are as below, leave others as it is.
client : Checked
auth_user_pass: /etc/openvpn/userpass.txt
remote: de2-ovpn-udp.pointtoserver.com
proto: udp
resolv_retry: infinite
The example above is set to connect to our German server i.e. de2-ovpn-udp.pointtoserver.com. If you wish to connect to another country, please refer to the full list of server names that you can connect by clicking here.
Note: If the stated field is not there, scroll down and select it from the Additional Field drop-down and click Add
Click Save.

Next, click on the Cryptography tab.
Ensure these details are as below, leave others as it is.
auth: SHA1
cipher: AES-256-CBC
mute_replay_warnings: Checked
tls_client: Checked
ca: Upload the CA file that you downloaded earlier
tls_auth: /etc/openvpn/tls-auth.key
auth_nocache: Checked
remote_cert_tls: server
key_direction: 1
Note: If the stated field is not there, scroll down and select it from the Additional Field drop-down and click Add
Click on Save & Apply.

3Create VPN interface.
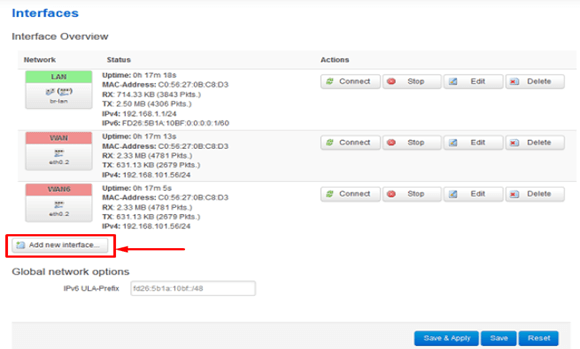
Navigate to Network > Interfaces

Click on Add New Interface

Enter the details as below:
Name of the new interface: PureVPN
The protocol of the new interface: select Unmanaged from the drop-down menu
Cover the following interface: Custom Interface – tun0

Click Submit.
4Set Firewall Rule for VPN connection.
Navigate to Network > Firewall
Click Add.

Configure the firewall as below.
Name: Pure_fw
Input: reject
Output: accept
Forward: reject
Masquerading: Checked
MSS clamping: Checked
Covered networks: Select PureVPN
For Inter-Zone Forwarding:
Select Allow forward from source zones
lan: Checked
wifi: Checked(if you have wifi interface configured)
Once that is done, click on Save & Apply.

5Connection complete.
Pure VPN is now configured in your OpenWRT router!
Go to Services > OpenVPN, check the box for Enabled next to PureVPN, then click the Start button to initiate the connection.

The connection should be completed within seconds, once connected you can confirm this by checking from the website: www.ipaddress.com
If the VPN connection doesn’t start then go to the /var/etc/client.conf directory, open the OpenVPN file and remove the line “secret shared-secret.key” save the file, and then recheck to connect.
If you are unable to access the Internet when the VPN is connected, look through the Firewall settings again, and ensure it’s set correctly before trying again.
If you are unable to connect to the VPN, navigate to Status > System Log and share it with us on your 24/7 support.
启动是提示:Options error: specify only one of --tls-server, --tls-client, or --secret
需要在路由器的:/etc/config 目录下找到purevpn,删除secret配置信息。
出现:VERIFY ERROR: depth=1, error=self signed certificate in certificate chain: C=HK, ST=Central, L=HK, O=Secure-ServerCA, OU=IT, CN=Secure-ServerCA, name=Secure-ServerCA, [email protected]
因为使用ca不正确导致,根据openvpn配置文件中的内容更新。
最终配置完成:


