分类目录归档:未分类

全自动、无人值守实时筛选cloudflare和gcore CDN优选IP

1、获取先前创建的十个域名的ID

".\curl\bin\curl.exe" -X GET "https://api.cloudflare.com/client/v4/zones/域名ID/dns_records?page=1&per_page=20&order=type&direction=asc" ^ -H "X-Auth-Email: 账号邮箱" ^ -H "X-Auth-Key: 前面获取的 API 令牌" ^ -H "Content-Type: application/json" > a2.txt

2、配置自动更新脚本

点击下载并按照自己的参数修改保存到先前准备的两个目录中:下载链接speed.bat

3、Gcore的IPv4地址和IPv6地址下载:

IPv4下载地址:ip.txt

IPv6下载地址:ipv6.txt


v2ray安装warp,增加ip6地址,无损解锁Netflix

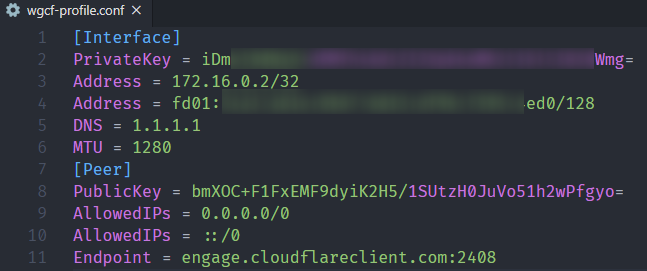
概述:如果默认安装warp,所有的流量都通过cloudflare会导致整体vps的速度下降。对于科学上网比较好的方式就是增加一个ipv6的地址只用于访问原来受到限制的流媒体,例如Netflix,而在访问其它网站的时候通过ipv4的地址跳过warp,保持网络速度不降低。

安装WireGuard

Ubuntu 20.04

以下安装步骤以 Ubuntu 20.04 系统为例,其它系统可以参照官方安装介绍:https://www.wireguard.com/install/

  1. # 更新软件包列表
  2. apt update
  3. # 安装依赖包
  4. sudo apt -y install net-tools openresolv
  5. # 安装WireGuard-tools
  6. sudo apt install wireguard

Debian 10

  1. apt install sudo lsb-release -y
  2. # 添加backports源
  3. echo "deb http://deb.debian.org/debian $(lsb_release -sc)-backports main" | sudo tee /etc/apt/sources.list.d/backports.list
  4. sudo apt update
  5. # 安装依赖包
  6. sudo apt -y --no-install-recommends install net-tools iproute2 openresolv dnsutils linux-headers-$(uname -r)
  7. # 安装WireGuard-tools
  8. sudo apt --no-install-recommends install wireguard-tools wireguard-dkms

Debian10 部分内核下 linux-headers 无法通过 apt-get install linux-headers-$(uname -r) 完成安装,可尝试如下解决

  1. sudo apt-get update
  2. sudo apt-get upgrade
  3. sudo apt-get dist-upgrade
  4. reboot
  5. sudo apt-get install linux-headers-$(uname -r) -y

CentOS 7

Method 1: a signed module is available as built-in to CentOS's kernel-plus:

$ sudo yum install yum-utils epel-release
$ sudo yum-config-manager --setopt=centosplus.includepkgs=kernel-plus --enablerepo=centosplus --save
$ sudo sed -e 's/^DEFAULTKERNEL=kernel$/DEFAULTKERNEL=kernel-plus/' -i /etc/sysconfig/kernel
$ sudo yum install kernel-plus wireguard-tools
$ sudo reboot

Method 2: users wishing to stick with the standard kernel may use ELRepo's pre-built module:

$ sudo yum install epel-release elrepo-release
$ sudo yum install yum-plugin-elrepo
$ sudo yum install kmod-wireguard wireguard-tools

Method 3: users running non-standard kernels may wish to use the DKMS package instead:

$ sudo yum install https://dl.fedoraproject.org/pub/epel/epel-release-latest-7.noarch.rpm
$ sudo curl -o /etc/yum.repos.d/jdoss-wireguard-epel-7.repo https://copr.fedorainfracloud.org/coprs/jdoss/wireguard/repo/epel-7/jdoss-wireguard-epel-7.repo
$ sudo yum install wireguard-dkms wireguard-tools

使用 wgcf 生成 WireGuard 配置文件

wgcf 是 Cloud­flare WARP 的非官方 CLI 工具,它可以模拟 WARP 客户端注册账号,并生成通用的 Wire­Guard 配置文件。

安装 wgcf

CODE

curl -fsSL git.io/wgcf.sh | sudo bash

注册 WARP 账户 (将生成 wgcf-account.toml 文件保存账户信息)

CODE

wgcf register

生成 Wire­Guard 配置文件 (wgcf-profile.conf)

CODE

wgcf generate

生成的两个文件记得备份好,尤其是 wgcf-profile.conf,万一未来工具失效、重装系统后可能还用得着。

编辑 WireGuard 配置文件

将配置文件中的节点域名 engage.cloudflareclient.com 解析成 IP。不过一般都是以下两个结果:

CODE

162.159.192.1
2606:4700:d0::a29f:c001

这样做是因为后面的操作要根据 VPS 所配备的网络协议的不同去选择要连接 WARP 的节点是 IPv4 或 IPv6 协议。

为 IPv4 Only 服务器添加 IPv6 网络支持

将配置文件中的 engage.cloudflareclient.com 替换为 162.159.192.1,并删除 AllowedIPs = 0.0.0.0/0。即配置文件中 [Peer] 部分为:

CODE

[Peer]
PublicKey = bmXOC+F1FxEMF9dyiK2H5/1SUtzH0JuVo51h2wPfgyo=
AllowedIPs = ::/0
Endpoint = 162.159.192.1:2408

原理:AllowedIPs = ::/0 参数使得 IPv6 的流量均被 Wire­Guard 接管,让 IPv6 的流量通过 WARP IPv4 节点以 NAT 的方式访问外部 IPv6 网络。
此外配置文件中默认的 DNS 是 1.1.1.1,博主实测其延迟虽然很低,但解析结果并不理想。由于它将替换掉系统中的 DNS 设置 (/etc/resolv.conf),同时为了防止单 DNS 服务器故障导致无法解析,建议使用不同组织提供的公共 DNS 服务器组合。以下配置供参考,小伙伴们请根据实际情况来填写。

CODE
DNS = 9.9.9.10,8.8.8.8,1.1.1.1

之后输入 ifconfig 查看当前VPS出口网卡的IP地址「下图红框部分」

VPS服务器无损部署Warp双栈解锁Netflix并解决Google验证码问题

输入 nano wgcf-profile.conf 并将下面2行内容添加到配置文件 [Interface] 部分的最后

  1. PostUp = ip rule add from [上面查出的IP] lookup main
  2. PostDown = ip rule delete from [上面查出的IP] lookup main

最终的格式效果样式应该如下:

  1. [Interface]
  2. PrivateKey = xxxxxxxxxxxxxxxxxxxx
  3. Address = xxx.xx.x.x/xx
  4. Address = xxxx:xxxx:xxxx:xxxx:xxx:xxx:xxxx:xxxx/xxx
  5. DNS = 1.1.1.1
  6. MTU = xxxx
  7. PostUp = ip rule add from xxx.xx.xxx.xxx lookup main
  8. PostDown = ip rule delete from xxx.xx.xxx.xxx lookup main
  9. [Peer]
  10. PublicKey = xxxxxxxxxxxxxxxxxxxxxxxxxxxxx
  11. AllowedIPs = 0.0.0.0/0
  12. AllowedIPs = ::/0
  13. Endpoint = engage.cloudflareclient.com:2408

将生成的 wgcf-account.toml  wgcf-profile.conf 文件保存好

一定需要添加好 PostUP  PostDown 规则,否则启动后可能存在失联风险,因为warp将接管VPS的ipv4及ipv6地址。

启动WireGuard

将上述生成的 wgcf-profile.conf 文件复制到 /etc/wireguard/ 目录下并重命名为 wgcf.conf

  1. # 重命名并复制配置文件
  2. sudo cp wgcf-profile.conf /etc/wireguard/wgcf.conf

我们输入 sudo wg-quick up wgcf 启动,检查是否有报错,如果没有报错,我们输入 ip a 命令应该能够看到 wgcf 的网络接口,类似如下

VPS服务器无损部署Warp双栈解锁Netflix并解决Google验证码问题

我们确认完成后,输入 sudo wg-quick down wgcf 停止运行

后台运行

  1. # 启用守护进程
  2. sudo systemctl start wg-quick@wgcf
  3. # 设置开机启动
  4. sudo systemctl enable wg-quick@wgcf
  5. # 查看状态
  6. sudo systemctl status wg-quick@wgcf
  7. # 停止
  8. sudo systemctl stop wg-quick@wgcf
  9. # 重启
  10. sudo systemctl restart wg-quick@wgcf

运行后,我们也可以通过如下命令查看相应的 IPv4 及 IPv6 地址

  1. # IPv4
  2. wget -qO- ip.gs
  3. # IPv6 Only VPS
  4. wget -qO- -6 ip.gs

如果ipv4检测显示的地址为 8.xxx 开头的ip地址,即为成功。

自定义IP分流配置模板

分流配置文件:outbounds配置文件或者routing配置文件,让IP、域名自定义。大家可根据代理脚本作者说明来查找文件路径!

  "outbounds": [
    {
      "tag":"IP4_out",
      "protocol": "freedom",
      "settings": {}
    },
    {
      "tag":"IP6_out",
      "protocol": "freedom",
      "settings": {
        "domainStrategy": "UseIPv6" // 指定使用 IPv6
      }
    }
  ],
  "routing": {
    "rules": [
      {
        "type": "field",
        "outboundTag": "IP6_out",
        "domain": ["geosite:netflix"] // netflix 走 IPv6
      },
      {
        "type": "field",
        "outboundTag": "IP4_out",
        "network": "udp,tcp"// 其余走 IPv4
      }
    ]
  }